

I am delighted to be speaking and holding workshops at the 17th annual BMXnet event on the 7th to 10th of September 2023. It is a special opportunity to share ideas and techniques with our peers for professional growth. I’m looking forward to the enriching experience with all of you who can participate again!

Updated & New Classes
for BMXnet 2023
Needle Control + Workshop – Thu. 11am-12:30pm on Stage

“Needle control” refers to the precise manipulation and handling of piercing needles during the piercing process. This class focuses on teaching participants how to confidently control the needle’s movement for accurate and controlled piercings, minimizing discomfort for the client. The “workshop” aspect implies that attendees will have the opportunity to engage in practical exercises to improve their needle control skills, potentially using simulators or safe training materials.
Needle Bending & Modification – Thu. 7pm-8:30pm

This class will be centered around modifying piercing needles to suit specific piercing situations. Needle bending and modification involves altering the angle or shape or the needle tip to accommodate different piercing placements, anatomies, or jewelry styles. This skill can be especially valuable for piercers who encounter unique client needs or want to offer more specialized piercing services.
by: Brian Skellie & Rubén Triguero
Needle Blanks Tips & Tricks Fri. 9am-10:30am
What is a needle blank? The use of needle blanks in disposable piercing technique, how to make tools with them.
Needle blanks are an essential component in the field of body piercing. They are clean, deburred and precisely sized needle tubing without a sharp point, typically made from high-quality stainless steel. These blanks serve as the foundation for creating various types of piercing needles. They play a crucial role in a single use/disposable piercing technique.
The single use/disposable piercing technique has gained popularity due to its emphasis on hygiene and reducing the risk of cross-contamination. In this technique, piercers use sterilized single-use needles and tools, eliminating the need for reprocessing. The needle blanks can come into play in this process, as they allow piercers to customize and create piercing devices to suit different types of piercings, ensuring a more comfortable and accurate piercing experience for the client.
by: Brian Skellie & Rubén Triguero
Open Piercing Workshop – Fri. 4pm-8:30pm
This is an open piercing workshop – if enough attendees want to get pierced, we will have a lot to talk about, demonstrate etc. … so get ready for some hands-on action!
by: Brian Skellie & more
Understanding Materials – Sat. 11am-12:30pm

This class delves into the various materials used in body jewelry, their properties, and their compatibility with different types of piercings and skin sensitivities. Topics will include specifications for metals, polymers, glass, and other materials commonly used in body jewelry, discussing factors like biocompatibility qualities, durability and why standards matter. Includes details about the APP Body Jewelry Verification Program: Phases 1 and 2.
Anodizing is Awesome! #anodizingisawesome – Sat. 4pm-5:30pm
Anodizing Class + Scientastic Demonstration!

Brian Skellie makes it easy for you to anodize your titanium and niobium body jewelry with detailed information and rationale, accompanied by live demonstration and step by step instructions. How can this surface finish process make a difference in your client’s healing results? How can you re-anodize for client jewelry if the color has worn off? These questions and more answered in this class.
Topics covered:
- How and why to include anodization into your workflow for a cleaner and less reactive surface finish
- How to offer instant coloration / re-colorization for customers
Anodization Advanced – Sun. 9am-10:30am
Hands-On live anodizing

Anodizing Class + Scientastic Demonstration!
Advanced class is extra paid (50 EUR)

Logic Board NextGen Wifi Statim 2000 G4
Control board for the color LCD Screen with WiFi for Statim 2000 G4 autoclaves
- Cracked?
- Not working?
- Pinched cable?
Replace it!
This is quickly attached with screws and adhesive backing. Includes decal for cover.
More details: Technical Service Bulletin 21-TSB-412
Description:
LCD touchscreen for old generation STATIM® G4 now available.
Models and Markets: All STATIM® G4 units; worldwide.
Summary:
A replacement LCD touchscreen is now available again to repair STATIM G4 units with old generation LCD controller boards.
Responding to the demand for a reasonable alternative to a complete cover replacement, Coltene SciCan has managed to secure a new supply of LCD touchscreen that are compatible with the existing old generation LCD controller boards.
This will reduce the cost of repairing units with old generation LCD controller boards needing only an LCD touchscreen replacement.
For LCD touchscreens compatible with old generation LCD controller boards, use the following part numbers:
- 01-112399S LCD module for Statim 2000S/G4
- 01-113641S LCD module for Statim 5000S/G4
The following are addressed in this Technical Service Bulletin:
- Why this is important.
- Identifying whether it is an Old Generation or Next Generation LCD controller board.
- Troubleshooting LCD touchscreen problems.
- LCD touchscreen replacement information and part numbers.
1. Why this is important.
Prior to this, if you were repairing an old generation LCD board that required an LCD touchscreen replacement, you could not use the new generation LCD touchscreen. Instead, you had to replace the LCD board, LCD module and cover as one complete assembly.
2. Identifying whether it is an Old Generation or Next Generation LCD controller board.
- If the unit is functioning, press Settings to view the unit’s software information. (Figure 1)
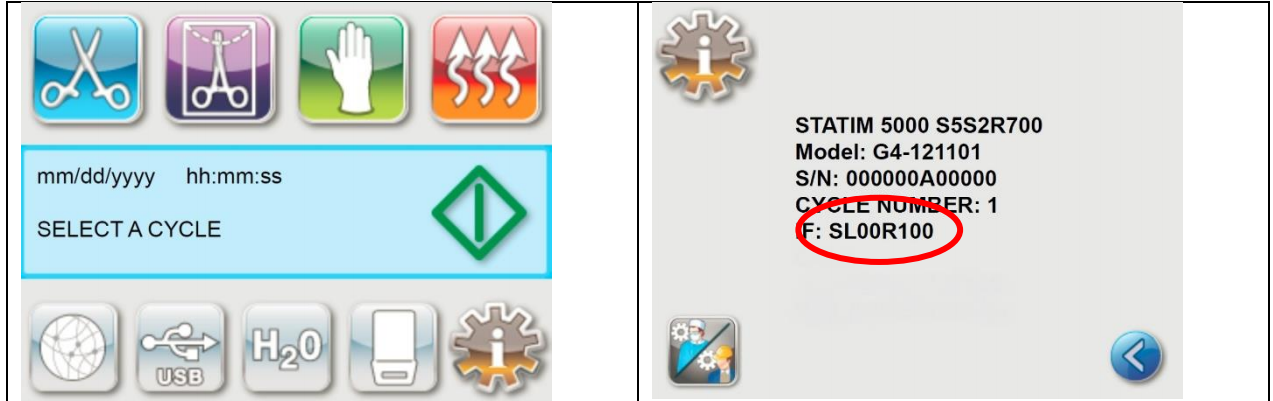
Fig. 1
Units with ‘00’ series software (SL00R1XX) are using old generation controller boards. Only the old generation LCD touchscreen is compatible with this board (01-112399S LCD module Statim 2000S/G4 or 01-113641S LCD module Statim 5000S/G4).
Units with ‘01’ series software (SL01R128 and up) are using new generation boards. Only the new generation LCD touchscreen is compatible with this board (01-115317S LCD NextGen Module Statim 2000/S G4 or 01-115318S LCD NextGen Module Statim 5000/S G4).
- If the unit is NOT functioning, you will have to remove the cover and fascia and read the information that is printed on the LCD controller board as shown in Figure 2.
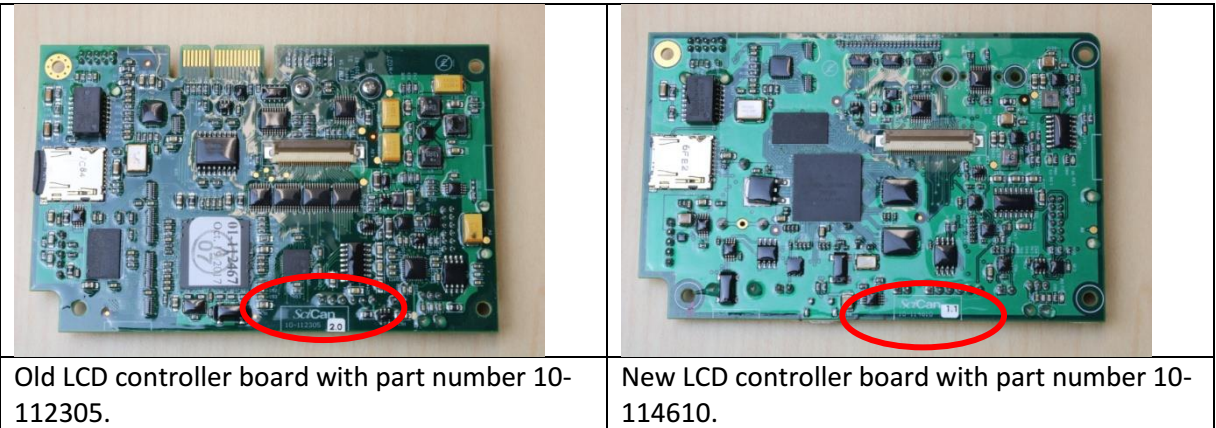
| Old LCD controller board with part number 10-112305. |
New LCD controller board with part number 10-114610. |
Fig. 2
- Units with an LCD controller board part number 10-112305 are compatible with the old generation LCD touchscreen (01-112399S LCD module Statim 2000S/G4 or 01-113641S LCD module Statim 5000S/G4).
- Units with an LCD controller board part number 10-114610 are compatible with the new generation LCD touchscreen (01-115317S LCD NextGen Module Statim 2000/S G4 or 01-115318S LCD NextGen Module Statim 5000/S G4).
3. Troubleshooting LCD touchscreen problems
Not all touchscreen problems require an LCD touchscreen replacement. Some can be resolved with software updates and contact cleaning.
The following troubleshooting steps assume that you are a qualified technician and familiar with the following:
- Removing a STATIM G4 cover.
- Updating software on a STATIM G4
- Identifying software versions SL00RXXX or SL01RXXX o Removing components in the STATIM fascia
- Backing up the Scilog folder
- Performing a Windows error check
Problem: The LCD screen is white
Possible cause: There is a software issue. The MicroSD card is corrupted.
- Start by removing the MicroSD card from logic board.
- Insert the MicroSD card into your computer’s MicroSD card reader and perform a Windows error check. When the check is complete, allow Windows to repair the card.
- Reinsert the MicroSD card into the logic board.
- Load a USB memory stick with the latest LCD software for the STATIM you are repairing and perform an LCD software upgrade.
Problem: The LCD screen is black
Possible causes: No power. LCD backlight is damaged.
- Check the power supply at the outlet.
- Check that the power cable is properly connected.
- Check the 5V DC coming from the power adapter.
- Use electronics spray to clean the contacts on the 5V power adapter and on the LCD.
- Check LCD for cracks.
- Use a tester LCD to determine if this will solve the problem.
Problem: The screen is unresponsive and stuck on the SciCan logo
Possible cause: Bad contact on the MicroSD card port located on the logic board.
- Remove the MicroSD card and clean both the MicroSD card and the port on the logic board using electronics spray (contact cleaner).
Problem: Flickering or yellow screen or different color on the screen
Possible cause: LCD touchscreen damaged.
- Check for any cracks on the LCD.
- Check the cycle records for any Cycle Fault caused by a major leak such as a CF3.
- Check and clean the contacts.
- Use a tester LCD to determine if this will solve the problem.
Problem: The LCD is getting stuck on some screens but works after restart.
Possible cause: MicroSD card is corrupted.
- Start by removing the MicroSD card from logic board.
- Insert the MicroSD card into your computer’s MicroSD card reader and perform an error check. If an error is found, replace the MicroSD card.
Problem: The LCD screen is not responding correctly.
Possible causes: Software issues. Screen damaged.
- Check the LCD software version – the SL number.
- If SL00Rxxx where xxx is a revision that is lower than R129, perform a software upgrade.
- Look for any cracks on the screen, which can be caused by a hard press on the LCD screen. If you see a crack, replace the LCD touchscreen.
4. LCD touchscreen replacement information and part numbers
For instructions on how to replace an LCD touchscreen module, see the service manuals for both STATIM 2000 G4 and STATIM 5000 G4, Section 6. Cover Assembly Removing and replacing the LCD touchscreen.
For LCD touchscreens compatible with old generation LCD controller boards, use the following part numbers:
- 01-112399S LCD module for Statim 2000S/G4
- 01-113641S LCD module for Statim 5000S/G4


FREE for those who purchased their Anodizer or STATIM from Brian through Piercers.com or Statim.us, and includes membership to Brian’s anodization training group.
Advanced Anodizing Techniques for Body Jewelry
Scientastic live demonstration!
Advanced class is paid or free for those who purchased their anodizer from Brian, and includes membership to a private professional anodizing forum full of videos, photos and expert user advice and detailed educational guide and color chart as a PDF download.
*Discounted for current anodizer owners and those who have already attended one of Brian’s previous Anodizing workshops
Piercing Techniques + Hands-On Live Piercing

This class covers a comprehensive range of piercing techniques, including discussion of sterilization, placement considerations, and proper procedures for different types of piercings. The “hands-on live piercing” component indicates that participants will have the opportunity to observe or participate in actual piercing procedures under the guidance of an experienced instructor. This type of interactive learning helps aspiring piercers gain practical skills in a controlled environment.

Upcoming
Events
- BMXnet 7th – 10th September 2023
- UKAPP 24th – 26th September 2023
- AUPP 23rd – 25th October 2023
- Needles : The Cutting Edge
- Anodizing is Awesome!
- Panel Discussion with Luis Garcia and Ryan Ouellette
- APP-PT 1st – 4th November 2023
- Needles : The Cutting Edge
- A rising tide lifts all boats
- Understanding Materials
