

I am delighted to be speaking and holding workshops at the 17th annual BMXnet event on the 7th to 10th of September 2023. It is a special opportunity to share ideas and techniques with our peers for professional growth. I’m looking forward to the enriching experience with all of you who can participate again!

Updated & New Classes
for BMXnet 2023
Needle Control + Workshop – Thu. 11am-12:30pm on Stage

“Needle control” refers to the precise manipulation and handling of piercing needles during the piercing process. This class focuses on teaching participants how to confidently control the needle’s movement for accurate and controlled piercings, minimizing discomfort for the client. The “workshop” aspect implies that attendees will have the opportunity to engage in practical exercises to improve their needle control skills, potentially using simulators or safe training materials.
Needle Bending & Modification – Thu. 7pm-8:30pm

This class will be centered around modifying piercing needles to suit specific piercing situations. Needle bending and modification involves altering the angle or shape or the needle tip to accommodate different piercing placements, anatomies, or jewelry styles. This skill can be especially valuable for piercers who encounter unique client needs or want to offer more specialized piercing services.
by: Brian Skellie & Rubén Triguero
Needle Blanks Tips & Tricks Fri. 9am-10:30am
What is a needle blank? The use of needle blanks in disposable piercing technique, how to make tools with them.
Needle blanks are an essential component in the field of body piercing. They are clean, deburred and precisely sized needle tubing without a sharp point, typically made from high-quality stainless steel. These blanks serve as the foundation for creating various types of piercing needles. They play a crucial role in a single use/disposable piercing technique.
The single use/disposable piercing technique has gained popularity due to its emphasis on hygiene and reducing the risk of cross-contamination. In this technique, piercers use sterilized single-use needles and tools, eliminating the need for reprocessing. The needle blanks can come into play in this process, as they allow piercers to customize and create piercing devices to suit different types of piercings, ensuring a more comfortable and accurate piercing experience for the client.
by: Brian Skellie & Rubén Triguero
Open Piercing Workshop – Fri. 4pm-8:30pm
This is an open piercing workshop – if enough attendees want to get pierced, we will have a lot to talk about, demonstrate etc. … so get ready for some hands-on action!
by: Brian Skellie & more
Understanding Materials – Sat. 11am-12:30pm

This class delves into the various materials used in body jewelry, their properties, and their compatibility with different types of piercings and skin sensitivities. Topics will include specifications for metals, polymers, glass, and other materials commonly used in body jewelry, discussing factors like biocompatibility qualities, durability and why standards matter. Includes details about the APP Body Jewelry Verification Program: Phases 1 and 2.
Anodizing is Awesome! #anodizingisawesome – Sat. 4pm-5:30pm
Anodizing Class + Scientastic Demonstration!

Brian Skellie makes it easy for you to anodize your titanium and niobium body jewelry with detailed information and rationale, accompanied by live demonstration and step by step instructions. How can this surface finish process make a difference in your client’s healing results? How can you re-anodize for client jewelry if the color has worn off? These questions and more answered in this class.
Topics covered:
- How and why to include anodization into your workflow for a cleaner and less reactive surface finish
- How to offer instant coloration / re-colorization for customers
Anodization Advanced – Sun. 9am-10:30am
Hands-On live anodizing

Anodizing Class + Scientastic Demonstration!
Advanced class is extra paid (50 EUR)

Replacement cover for Statim 2000 G4 autoclaves
Replace it!
More details: Technical Service Bulletin 21-TSB-424
Description:
Implementation of the new G4+ LCD Controller board for STATIM® G4 2000 and 5000.
Models and Markets: All STATIM® G4 units; worldwide.
Summary:
- Replace a 3rd Generation (G4+) LCD board with a 3rd Generation (G4+) LCD board.
- Replacement 2nd Generation (Next Gen) LCD boards continue to be available. Use 2nd Generation (Next Gen) LCD boards to replace 2nd Generation (Next Gen) LCD boards.
- Replacement 1st Generation (Old Gen) LCD boards are no longer available. Replace 1st Generation board using a complete cover assembly that includes a 2nd Generation (Next Gen) LCD board.
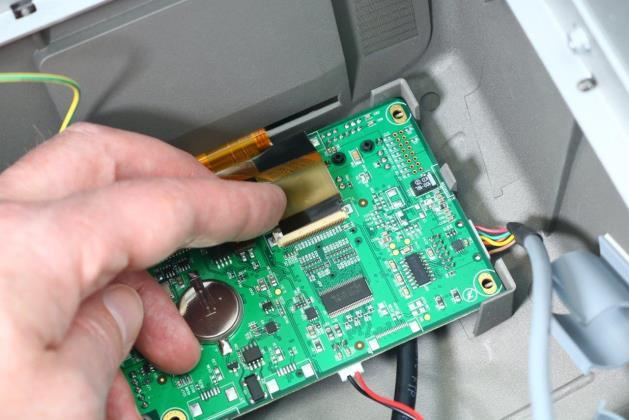
1. Identifying LCD controller boards
Identifying whether it is a 1st Generation (Old Gen), 2nd Generation (Next Gen) or 3rd Generation (G4+) LCD controller board.
On a functioning unit
If the unit is functioning, press Settings to view the unit’s software version information.
 =>
=>
Figure 1. Press SETTINGS to find the software versio

n number.
|
SOFTWARE VER. NUMBER |
SL00R1XX |
SL01R128 and up |
SL12R100 and up |
|
LCD BOARD TYPE |
1st Generation (Old Gen) LCD Board |
2nd Generation (Next Gen) LCD Board |
3rd Generation (G4+) LCD Board |
|
WHAT TO DO |
Units with LCD controller boards with ‘SL00’ series software (SL00R1XX) will require a complete replacement cover that comes with all needed components pre– see 1st Generation LCD Board 10-112305 in the spare parts Table 3 in section 3, below. |
Units with LCD controller boards with ‘SL01’ series software (SL01R128 and up) will require only the replacement of the LCD controller board – see 2nd Generation LCD Board 10-114610 in the spare parts Table 3 in section 3, below. |
Units with LCD controller boards with ‘SL12’ series software (SL12R100 and up) will require only the replacement of the LCD controller board – see 3rd Generation LCD Board 10-116682 in the spare parts Table 3 in section 3, below. |
Table 1. Identifying board types using software versions.
On a non-functioning unit
If the unit’s LCD is not functioning, you will have to remove the cover and fascia and read the information that is printed on the LCD controller board as shown in Table 2.
|
BOARD TYPE AND NUMBER |
WHERE THE NUMBER IS LOCATED ON THE BOARD |
WHAT TO DO |
|
1st Generation (Old Gen) LCD Board 10- 112305 |
|
Units with an LCD controller board part number 10-112305 (old generation) will require complete replacement cover that comes with all needed components preassembled – see 1st Generation LCD Board 10-112305 in the spare parts table in section 3, below. |
|
2nd Generation (Next Gen) LCD Board 10- 114610 |
|
Units with an LCD controller board part number 10-114610 (next generation) will require only the replacement of the LCD controller board – see 2nd Generation LCD Board 10-114610 in the spare parts table in section 3, below. |
|
3rd Generation (G4+) LCD Board 10-116682 |
|
Units with an LCD controller board part number 10-116682 (G4+) will require only the replacement of the LCD controller board since the LCD touch screen and unit fascia are compatible with the G4+LCD controller board –see 3rd Generation LCD Board 10-116682 in the spare parts Table 3 in section 3, below. |
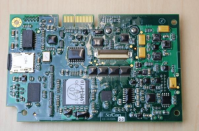


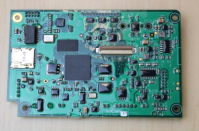
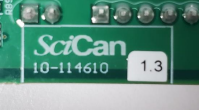


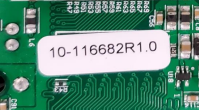

Table 2. Identifying board types visually.
2. What models are affected?
STATIM units built in or after May 2022 will have the 3rd Generation (G4+) LCD Controller boards.
3. Determining the spare parts you will need
|
1st Generation (Old Gen) LCD Board 10-112305 |
Statim 5000 WIFI |
01-114710S Cover NextGen WIFI ST5000S G4 noP |
|
Statim 5000 no WIFI |
01-112393S Cover NextGen ST5000S G4 no Printer |
|
|
Statim 2000 WIFI |
01-114706S Cover NextGen WIFI Complete 2000G4 |
|
|
Statim 2000 no WIFI |
01-112414S Cover NextGen Complete ST2000 G4 |
|
2nd Generation (Next Gen) LCD Board 10-114610 |
Statim 5000 WIFI |
01-115465S Logic WIFI PCB Statim G4 NextGen |
|
01-115318S LCD NextGen module Statim 5000/SG4 |
||
|
01-114710S Cover NextGen WIFI ST5000S G4 no Printer, for units with Rev 7 controller boards |
||
|
01-115563S Cover NextGen WIFI 5000S G4 no Printer, for units with Rev 8 controller boards |
||
|
Statim 5000 no WIFI |
01-115313S Logic PCB Statim G4 NextGen Kit |
|
|
01-115318S LCD NextGen module Statim 5000/SG4 |
||
|
01-112393S Cover NextGen ST5000S G4 no Printer, for units with Rev 7 controller boards |
||
|
01-115562S Cover NextGen 5000S G4 no Printer, for units with Rev 8 controller boards |
||
|
Statim 2000 WIFI |
01-115465S Logic WIFI PCB Statim G4 NextGen |
|
|
01-115317S NextGen LCD module Statim 2000/SG4 |
||
|
01-114706S Cover NextGen WIFI Complete 2000G4, for units with Rev 7 controller boards |
||
|
01-115565S Cover NextGenComplete WIFI 2000G4, for units with Rev 8 controller boards |
||
|
Statim 2000 no WIFI |
01-115313S Logic PCB Statim G4 NextGen |
|
|
01-115317S NextGen LCD module Statim 2000/SG4 |
||
|
01-112414S Cover NextGen Complete ST2000 G4, for units with Rev 7 controller boards |
||
|
01-115564S Cover NextGen Complete ST2000 G4, for units with Rev 8 controller boards |
|
3rd Generation (G4+) LCD Board 10-116682 |
Statim 5000 WIFI |
01-116785S Logic PCB Statim G4+ WIFI kit |
|
01-115318S LCD NextGen module Statim 5000/SG4 |
||
|
01-116779S Cover G4+ Complete WIFI 5000S NoPr, 8 |
||
|
Statim 5000 no WIFI |
01-116784S Logic PCB Statim G4+ kit |
|
|
01-115318S LCD NextGen module Statim 5000/SG4 |
||
|
01-116776S Cover G4+ Complete 5000S NoPrinter,8 |
||
|
Statim 2000 WIFI |
01-116785S Logic PCB Statim G4+ WIFI kit |
|
|
01-115317S NextGen LCD module Statim 2000/SG4 |
||
|
01-116778S Cover G4+ Complete WIFI 2000G4, 8 |
||
|
Statim 2000 no WIFI |
01-116784S Logic PCB Statim G4+ kit |
|
|
01-115317S NextGen LCD module Statim 2000/SG4 |
||
|
01-116777S Cover G4+ Complete ST2000 G4+, 8 |
Table 3. Determining the spare part kit number.
4. Replacing an LCD controller board
1st Generation (Old Gen) LCD Board 10-112305
To complete this repair, replace the cover using a complete cover replacement kit that includes a cover, fascia, LCD controller board, and LCD display module with decal. See Service Guide for instructions on removing and replacing the cover.
IMPORTANT!
- Before you begin the repair, record the original unit’s serial number, cycle count and calibration offset values.
- Remove the MicroSD card from the old LCD controller board in the cover assembly and copy the SCILOG folder to a computer.
- Remove the MicroSD card from the new LCD controller board in the new cover assembly and insert it into the microSD card reader connected to your computer.
- Select the SCILOG folder on your computer and copy it to the microSD card. If the computer prompts you to replace existing folders and /or directories, select ‘Yes to All.’
- Insert the microSD card into the new LCD controller board in the new cover assembly and install the new cover assembly.
- On completing the repair, calibrate the level.
2nd Generation (Next Gen) LCD Board 10-114610
To complete this repair, you can replace the LCD controller board only or perform a complete cover replacement using the kit that includes a cover, fascia, LCD controller board, and LCD display module with decal. See Service Guide for instructions on removing and replacing the cover and LCD controller board.
IMPORTANT!
- Before you begin the repair, record the original unit’s serial number, cycle count and calibration offset values.
- Remove the MicroSD card from the old LCD controller board and copy the SCILOG folder to a computer.
- Remove the MicroSD card from the new LCD controller board and insert it into the microSD card reader connected to your computer.
- Select the SCILOG folder on your computer and copy it to the microSD card. If the computer prompts you to replace existing folders and /or directories, select ‘Yes to All.’
- Insert the microSD card into the new LCD controller board and install the new LCD controller board.
- On completing the repair, calibrate the level.
3rd Generation (G4+) LCD Board 10-116682
- Record the original unit’s serial number, cycle count and calibration offset values.
- Remove the LCD controller board.
- Remove the MicroSD card from the old LCD controller board and copy the SCILOG folder to a computer or USB device for the customer to preserve the cycle records.
- On the new LCD board, connect the Ethernet cable, RS232 communication cable to the main controller, speaker and USB. Connect the grounding wire.

- Connect the LCD display ribbon cable, pushing it down into position and closing the hinged connector. Give the ribbon cable a gentle tug to ensure it is properly held in position.
- Reinstall the cover.
- Power the unit ON. It may take a few minutes for the software to load. Once the Home screen appears, check that the unit has the correct serial number, cycle count and calibration values. If the unit does not have the correct information, go to the technician menu and activate the BACKUP NVRAM function. Check the other unit settings and adjust as needed.
- Calibrate the level.
IMPORTANT!
When the cover is removed, a dielectric strength test (Hi-Pot) AND a protective bonding impedance test (ground continuity) must be performed on the STATIM when the work is completed and after the cover has been returned to the unit.


FREE for those who purchased their Anodizer or STATIM from Brian through Piercers.com or Statim.us, and includes membership to Brian’s anodization training group.
Advanced Anodizing Techniques for Body Jewelry
Scientastic live demonstration!
Advanced class is paid or free for those who purchased their anodizer from Brian, and includes membership to a private professional anodizing forum full of videos, photos and expert user advice and detailed educational guide and color chart as a PDF download.
*Discounted for current anodizer owners and those who have already attended one of Brian’s previous Anodizing workshops
Piercing Techniques + Hands-On Live Piercing

This class covers a comprehensive range of piercing techniques, including discussion of sterilization, placement considerations, and proper procedures for different types of piercings. The “hands-on live piercing” component indicates that participants will have the opportunity to observe or participate in actual piercing procedures under the guidance of an experienced instructor. This type of interactive learning helps aspiring piercers gain practical skills in a controlled environment.

Upcoming
Events
- BMXnet 7th – 10th September 2023
- UKAPP 24th – 26th September 2023
- AUPP 23rd – 25th October 2023
- Needles : The Cutting Edge
- Anodizing is Awesome!
- Panel Discussion with Luis Garcia and Ryan Ouellette
- APP-PT 1st – 4th November 2023
- Needles : The Cutting Edge
- A rising tide lifts all boats
- Understanding Materials
