

Sign up for the workshop with Brian Skellie
APP Conference / Online “Anodizing is Awesome!”
Previously Presented at BMXnet, UKAPP, APP, LBP, 2º Congresso Educativo para Perfuradores Corporais da América do Sul – ATPB 2013 & more events
1) What is Anodizing?
Anodizing is a process where a coating is built up on the surface of certain metals (titanium, niobium, tantalum, aluminum, magnesium and zinc) by heating, with chemicals, or by electricity. In the case of titanium, the coating that is built up is a layer of titanium dioxide. Titanium dioxide, which is also known as titanium oxide, occurs naturally on the surface of titanium. Anodizing the surface of titanium can be done by the use of heat but the results are not easily controlled. The most common method is to form an oxide layer on the surface with the use of electricity. The way that this is done is with a variable power supply in which an electrode is connected to the positive side (anode), and one to the negative side (cathode). Both are then submerged into a mildly conductive solution, thus completing the electrical circuit. The piece that is to be anodized is connected to the positive side, and that is why the process is called “anodizing”.
2) How are the different colors achieved?
Anodizing does not involve any dyes. The color on the surface is apparent because light reflects through the created oxide layer to create a color. Without the presence of light that color wouldn’t be there. Light reflects off of the surface of titanium. When a piece is high polished and not anodized, it reflects its mirror finish. When a piece is anodized, the light has to reflect [refract] off of the surface through the added oxide layer. The oxide layer filters the light waves passing through it and causes interference in the light reflected. This causes the light to reflect in a color. The color that is apparent on an anodized piece of titanium depends on the thickness of the oxide layer that has been applied to it. The thickness of the oxide layer that is formed during the process depends on the voltage of electricity that has been that has been applied to it. If you are anodizing more than one piece and you want them to be the exact same color, it would be a good idea to anodize them all at the same time. You may not get a color match if you do them on separate occasions. Thicker and/or larger pieces to be anodized may take longer and sometimes increased voltage, to achieve a similar color to their thinner, smaller counterparts.
3) What will you need to start anodizing?
 An anodizer
 - A cathode (A sheet of non-corrosive metal like titanium or stainless steel. A scrap piece of Ti or SS that is larger than the piece being anodized will work, as well)
- An anode ( The piece being anodized)
- A submersion tank (This should be made of glass or plastic)
- An electrolytic solution (TSP or a TSP-PF cleaning solution with water, baking soda with water, cola soft drink)
- Electrodes
It is possible build your own anodizer. You can find information about this on the internet. It is much easier to buy an anodizer from a company that sells them already built. We get ours from Reactive Metals in Arizona. They come with the anodizer, electrodes, stainless steel cathode sheet, instructions, and a pamphlet with some info about anodizing.
![The Anodizer your studio needs! The power to create scintillating colors, run larger baths and precise control. It is the right power supply for both one of a kind and production anodizing of body jewelry. Full digital voltage and amperage meters. 0 to 120 Volts. Extremely fine controls for more color options, and more precision. Anodizing titanium parts such as jewelry before sterilization and wear renders the surface smoother and passive. The anodization process removes microscopic particulate matter that would otherwise be missed by acid or alkaline cleaning, solvents, steam and ultrasonic methods. [*Reference - ASTM F-86 standard method for surface finish and passivation] This anodizer include two sets of color coded leads, one pair of rubber gloves, one stainless steel cathode and full instructions and support. In addition, Brian Skellie's body art specific instruction, tips and tricks gathered over two decades of experience to color and passivate titanium and niobium body jewelry with safe and artistic effects. Come to a presentation, or contact Brian for more information](https://i0.wp.com/brnskll.com/wp-content/uploads/2011/06/Anodizer.jpg?resize=238%2C300&ssl=1 "The Anodizer your studio needs! The power to create scintillating colors, run larger baths and precise control. It is the right power supply for both one of a kind and production anodizing of body jewelry. Full digital voltage and amperage meters. 0 to 120 Volts. Extremely fine controls for more color options, and more precision. Anodizing titanium parts such as jewelry before sterilization and wear renders the surface smoother and passive. The anodization process removes microscopic particulate matter that would otherwise be missed by acid or alkaline cleaning, solvents, steam and ultrasonic methods. [*Reference - ASTM F-86 standard method for surface finish and passivation] This anodizer include two sets of color coded leads, one pair of rubber gloves, one stainless steel cathode and full instructions and support. In addition, Brian Skellie's body art specific instruction, tips and tricks gathered over two decades of experience to color and passivate titanium and niobium body jewelry with safe and artistic effects. Come to a presentation, or contact Brian for more information")
4) Which voltage achieves which color?
The more voltage that is applied during the process, the thicker the oxide layer that is achieved. The voltage range used in this type of anodizing is usually between 15-120V. The colors are in approximate ranges, and will differ slightly for each set up. It is good to start a little lower and turn it up gradually.
| Color | Copper | Dark Purple | Dark Blue | Light Blue | Yellow | Fuchsia | Blurple | Teal | Green |
|---|---|---|---|---|---|---|---|---|---|
| Voltage range | 8 to 10 V | 15 to 16 V | 18 to 20 V | 27 to 30 V | 48 to 50 V | 62 to 63 V | 72 to 75 (up to 79) V | 81 to 85 (up to 89) V | 91 to 92 (up to 95) V |

This chart represents the voltage ranges that I use. I can usually achieve the color I am after within these ranges, however I always start out lower and work my way up. You can change the color of an anodized piece to another color of a higher voltage. It is possible, for instance, to turn a dark blue anodized piece to light blue, yellow, or to any of the colors of a higher voltage. It is not possible, however, to turn that dark blue piece to a purple or a copper color. If you wanted to do that, the oxide layer would have to be stripped off through polishing/steam cleaning. The quality and consistency of the oxide layer formed, largely depends on the quality of the surface finish. When we anodize a piece of jewelry to be sent out to a customer, we sometimes do not get the result we want on the first try. The piece then gets re-polished and steam cleaned, to be anodized a second time. It might be a really good idea, if you are planning to anodize jewelry yourself, to get a polishing wheel and a steam cleaner.
5) What are the benefits of an anodized surface?
- Pretty colors
- Color coding
- A more smooth, durable, and biocompatible surface

- Removal of microscopic debris embedded in the surface
- Passivation according to the ASTM F86 Standard Practice for Surface Preparation and Marking of Metallic Surgical Implants
6) Safety
- NEVER touch the anode to the cathode when the power is on! This may cause your electrical circuit to short out, and may cause you to receive an electric shock. When your anodizer is not being used, shut the power off and put a cover over your submersion tank.
- It would be a good idea for the anodizing station that you set up to be in a well ventilated area. Although it would be a very small amount, hydrogen gas is a byproduct of anodizing and can be explosive.
- Because you are dealing with electricity, the use of rubber gloves is recommended.
- Etching body jewelry is not recommended as it makes the surface rough.
7) Useful Websites
8) Interesting Video
Scientastic demonstration with a strip of Ti about a minute in.
Scienterrific example of a very simple anodizing setup (interesting for one-off projects, not so good or precise for frequent studio use.)
Special thanks to Jonathan Loveless and JD Lorenz of Industrial Strength Body Jewelry for sharing photo and workshop materials.
Some frequently asked questions:
Do I need to use an ultrasonic to clean my jewelry before anodizing? No
Cleaning the jewelry with detergent, alcohol or a steamer first can help get the brightest results. If you anodize every piece to clean and passivate to the appropriate level of the ASTM F86 standard, you won’t usually have to use an ultrasonic. Anodizing gets matter off the surface and cleans down to one millionth of an inch with oxygen, and may also neutralize endotoxins.
I anodize every piece of jewelry right before use so that the surface finish is free of debris that an ultrasonic alone can’t remove. I rinse with a spray of distilled water or steam, then sterilize it with my Statim autoclave. I choose not to use an ultrasonic cleaner because the vibrations can damage the polish of body jewelry unless the pieces are disassembled and kept separated in non-marring cups or jigs.
- You can have your favorite manufacturers anodize everything immediately after polishing to the first low voltage light brown/bronze color before they ship.
- That makes sure it is all Ti or Nb, clean enough to anodize again, and seals the surface finish so that it does not oxidize in air with random crystals that interfere with high voltage anodization if it sits around in stock for a long time.
Do you find a stronger or weaker electrolyte solution works better for you? It depends on the goal
- Stronger solutions conduct electricity better and work well for lower voltages spectrum colors, however this will overexpose Ti at higher voltages, and you are more likely to have to do more polishing if you make a mistake.
- Weaker solutions slow the current so you can get higher spectrum colors, especially for anodic painting with a sponge or brush for high voltage effects.
I tend to make the solutions at 3 to 5% concentration of electrolyte to distilled water by weight and dilute if needed for anodic painting. Liquid TSP is the easiest I have found to mix with distilled water to make a clear solution, otherwise I mix the powdered electrolyte then let it settle. The solution does not spoil quickly, so I mix a gallon at a time. The solution should be filtered regularly to remove debris that sheds from jewelry, and discarded if it takes on an unusual odor or gets contaminated.
How can I make multicolor patterns? Anodic painting /spot anodizing with a handheld cathode
Only the part of the jewelry exposed to the electrolyte will change color.
- Masking, such as an o-ring or bit of tape covering a piece of Ti will prevent anodization of the masked area and allow you to create patterns.
- Contact with an electrolyte moistened cotton swab, sponge, toothpick or paintbrush which is wired to the cathode can anodize spots, and be used to make fades, patterns, and oil slick effects.
Use heat shrink tubing, electrical tape or plastic insulation for handheld cathodes to prevent shorts.
What about black? For Nb only: heat treat to black with a blowtorch, followed by polishing.
")
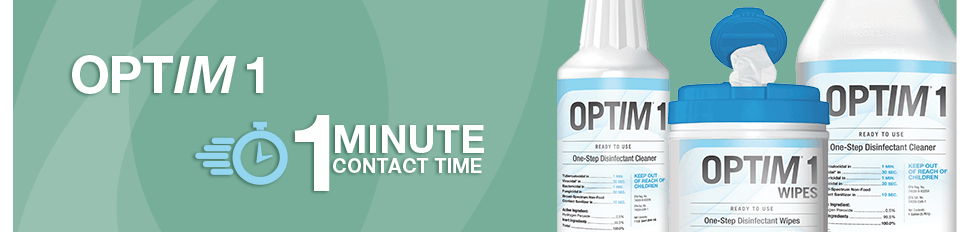
OPTIM 1 Ready To Use Wipes (12/case)
OPTIM 1 is effective against Coronavirus family.
Demonstrated virucidal efficacy extends to new and emerging pathogens.
- 30-second virucidal contact time applies to Novel Coronavirus (COVID-19), Severe Acute Respiratory Syndrome (SARS CoV) and Middle East respiratory syndrome (MERS CoV).
≤1 Minute Contact Times
OPTIM 1 is proven to deliver superior kill performance; contact times are faster which ensures compliance and provides confidence that disinfection has been achieved.
OPTIM 1 has been proven effective against difficult to kill pathogens such as Norovirus, giving you confidence that your facility is protected against pathogens of concern.
OPTIM 1 – Fast & Effective!
- 1 Minute Virucidal claim against non-enveloped and enveloped viruses!
- 1 Minute Tuberculocidal claim!
- 30 Second Sanitizer – 99.9% broad-spectrum kill (>3 log reduction) of vegetative bacteria!
Comparison
The Perfect Balance - No compromise between efficacy and being protected.
With a 1 minute broad-spectrum contact time, OPTIM 1 is one of the fastest and most effective cleaner & intermediate level disinfectants. It is listed as a category IV, the EPA’s lowest toxicity category.
OPTIM 1 provides the confidence that you are compliant and protecting your patients, staff, equipment and the environment without compromise; the perfect balance.
Effective One-Step Cleaner
- Removes organic debris while disinfecting, saving you time and money1
Fast Broad-Spectrum Disinfectant
- 1 minute contact time ensures compliance, saving you time and money2
Protect yourself and your patients
- In the lowest EPA toxicity category, category IV
- No GHS hazard pictograms, signal words or statements required
- No VOCs (volatile organic compounds)
Sustainable
- Active ingredient, Hydrogen Peroxide, breaks down into
water and oxygen - No active residues
reduce environmental impact
Time and Cost Efficient
- ½ as many wipes as the leading competitor are needed to keep your surface wet long enough to achieve disinfection3
Compatible
Designed to be compatible with a wide range of materials4
| The Dental Advisor | OPTIM 1: Editor’s Choice - 92% Overall Rating | Download |
|---|---|---|
| The Dental Advisor | Environmental Surface Wetness Test: Comparison of Disinfectant Wipes | Download |
| The Dental Advisor | Effect of OPTIM 1 on Tensile Properties of Dental Chair Fabrics | Download |
| The Dental Advisor | OPTIM 1 Environmental Surface Cleaning Investigation | Download |
| Disinfection Digest | OPTIM 1 Safety Profile Overview | Download |
| Disinfection Digest | OPTIM 1 Your Ideal Disinfectant | Download |
| Dental Aegis | PEER PERSPECTIVE: Ongoing Evolution of Germicides: Accelerated Hydrogen Peroxide for Surface Disinfection | Download eBook |
| Product Name | Active Ingredient | Mycobacteria | Non-enveloped Viruses | Enveloped Viruses | Bacteria | Fungicidal | Cleaning Claim | GHS Warning Pictograms | ||||||||||
|---|---|---|---|---|---|---|---|---|---|---|---|---|---|---|---|---|---|---|
| TB | Adeno | Polio | Noro | Rota | RSV | HIV | HBV (Hep.B) | HCV (Hep.C) | Influenza A | MRSA | VRE | E.coli | PSA | |||||
| OPTIM 1 | 0.5% Accelerated Hydrogen Peroxide | 1 | 30 sec | 30 sec | 30 sec | 30 sec | 30 sec | 30 sec | 30 sec | 30 sec | 30 sec | 1 | 1 | 1 | 1 | 30 sec | One-Step Cleaner | None |
| OPTIM 33TB | 0.5% Accelerated Hydrogen Peroxide | 5 | 1 | 1 | 1 | 1 | 1 | 1 | 1 | 1 | 1 | 1 | 1 | 1 | 10 | One-Step Cleaner | None | |
| Birex SE | Phenolics | 10 | 10 | 10 | 10 | 10 | 10 | 10 | One-Step Cleaner |   |
||||||||
| ProSpray | Phenolics | 3 | 1 | 3 | 3 | 3 | One-Step Cleaner | |
||||||||||
| Caviwipes1 | Quats-alcohol | 1 | 3 | 1 | 1 | 1 | 1 | 1 | 1 | 1 | 1 | 1 | One-Step Cleaner |  |
||||
| Caviwipes | Quats-alcohol | 3 | 2 | 2 | 2 | 3 | 2 | 2 | 3 | 3 | Two-Step Cleaner | |
||||||
| Caviwipes AF | Quats | 5 | 2 | 5 | 5 | 5 | 5 | 5 | 5 | 5 | One-Step Cleaner | None | ||||||
| Opticide 3 | Quats-alcohol | 2 | 3 | 3 | 2 | 2 | 2 | 2 | 2 | 2 | 2 | 2 | 2 | 2 | Two-Step Cleaner | |
||
| Sanicloth AF3 | Quats | 3 | 3 | 3 | 3 | 30 sec | 3 | 3 | 3 | 3 | 3 | 3 | 3 | 3 | One-Step Cleaner | None | ||
| Sanicloth Super | Quats-alcohol | 1 | 2 | 2 | 2 | 2 | 2 | 2 | 2 | 2 | 2 | 2 | 2 | 2 | One-Step Cleaner | |
||
| Sultan Volo | Quats-alcohol | 2 | 2 | 2 | 2 | 2 | 2 | 2 | 2 | 2 | Two-Step Cleaner | |
||||||
| Discide Ultra | Quats-alcohol | 1 | 1 | 1 | 1 | 1 | 1 | 30 sec | 1 | 1 | 1 | 1 | 1 | Two-Step Cleaner | |
|||
| Lysol IC 111 | Quats-alcohol | 6 | 3 | 1 | 10 | 30 sec | 30 sec | 30 sec | 30 sec | 30 sec | 30 sec | 2 | 2 | 2 | 2 | 2 | One-Step Cleaner | |
| Clorox HP Wipes | 1.4% Hydrogen Peroxide | 5 | 3 | 1 | 30 sec | 30 sec | 30 sec | 30 sec | 1 | 1 | 30 sec | 30 sec | 30 sec | 5 | One-Step Cleaner | None | ||
1 John Molinari, PhD, Peri Nelson, BS, and Devi J.V. Raghavan, BDS. Optim 1 Cleaning and Disinfection Study. Ann Arbor: Dental Advisor, 2016. |
Support and membership to our private forum full of information videos, photos, expert user advice and inspiration is included with purchase!
Learning Content
Private for colleagues who purchase their equipment through Brian Skellie / Piercers.com / Statim.us
Contact Brian any time for support…
I am trying to find out why my copper bracelet came out of my ultrasonic with beautiful rainbow anodized colors. It has steel alloy ribbon ends, just cheap stuff nothing special. It is beautiful and I am hoping to recreate the event but in the meantime was searching to see if others had encountered an Ultrasonic cleaner anodizing copper jewelry.
I’d suspect that the patina of colors is temporary, and caused by oxidization in the ultrasonic solution, increased by ion deposition from the two dissimilar metals. What was the solution?
Excelente información, felicitaciones amigo!
Great information about anodizing. Your chart with the colors is excellent.
Thank you so much!!
Check out Anodization for body jewelry for more